Valentine’s Day is such a cute holiday to celebrate with little ones! Kids can exchange cards, parents can gift chocolates, and even the littlest ones can get dressed up in heart-shaped attire. It’s an adorable time for everyone!
This Valentine’s Day (and the 14 days leading up to it), I’ll be babysitting my niece and nephew. I really do have my hands full with four kids under five in the house but I thought it would be beneficial for everyone to let the magic of crafts entertain them! That’s why I’ve decided to post a little something on lovey-dovey crafts that will excite and inspire the munchkins! I’ve found a little something for everyone to partake in too – as I have a one year old Sun Bear, a two year old Polar Bear, a three year old Panda Bear, and a four year old Grizzly Bear. If you’re feeling as adventurous as me this week, give it a glittery whirl too!
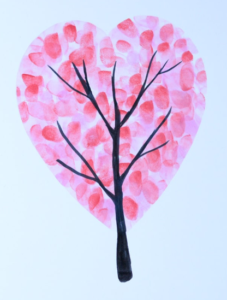
Photo courtesy of Easy Peasy and Fun.
Infants
Even little babies can benefit from arts and crafts time. The bright colours, messy feel of paint, and fun interactions with parents can boost developmental skills – plus the resulting craft is a wonderful keepsake! Bonus, this craft works well for all ages but it is one of the few that is possible to do with infants.
This Valentine’s craft idea is a super cute, heart-shaped tree! Here is what you will need:
One sheet of white paper
Washable ink pads or finger paint (varying colours)
One black marker
Start by drawing a tree trunk on the white paper with the black marker. Then you can use your child’s feet, hands, or fingerprints to outline a heart at the top of the tree where the leaves would be. If you use your child’s fingerprints, it honestly looks the best as it resembles leaves but your child may not be old enough to retain his or her attention for long enough to do this. If your child is quite young, I recommend using his or her feet and angle the footprints so they resemble a heart. It takes just seconds but it’s a fun one for you and an interesting activity for them!
This craft worked best on my three year old Panda Bear. It was captivating enough for him, as opposed to Grizzly Bear who found it boring, but it also held his attention, which was not the case for the younger two.
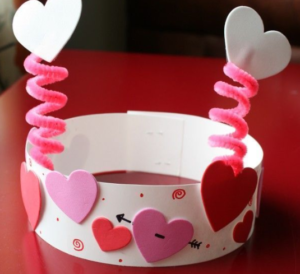
Photo courtesy of Events to Celebrate.
Toddlers
Toddlers, along with most age groups, love two things – messy art and art that doubles as accessories. So I helped the kids make springy heart crowns and fashionable purses. Both Sun Bear and Polar Bear loved these crafts!
Here’s what you’ll need for the crowns:
White and red paper (thick construction paper works best)
Pipe cleaner (various colours)
White glue
Scissors
Bowl
Q-tips
Use the scissors to cut long strips out of the white paper. You’ll need two strips to glue together, end to end, to make a crown-shaped hat for your child. It’s best to measure the paper against your child’s head before gluing. Cut out little hearts from the red paper.
Now put a dollop of glue into a small bowl. Give a Q-tip to each of the kids partaking in the craft and show them how to apply the glue to the red hearts using the Q-tip. This increases fine motor skills while also reducing the resulting mess from using the glue bottle. Bonus, it also prevents kids from fighting over the glue bottle. Panda bear was best at this stage too. He didn’t load on the glue like Grizzly Bear and he was by far cleaner than the others!
When the crowns are decorated, poke holes in the white paper to insert the pipe cleaners. Twist the pipe cleaners around themselves to keep them pointing upwards. You can then use your finger to twist the remaining pipe cleaner portions to give them bounce. Poke holes through a few hearts to add them to the pipe cleaners to give the crown extra flare. Allow the kids to show off their creations to each other! Polar Bear wore his crown for a full day, often wearing his and others’ whenever possible!
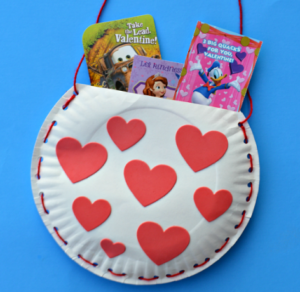
Photo courtesy of The Resourceful Mama.
Here’s what you’ll need for the purses:
Two paper plates per purse
Red construction paper (or other colour)
Pipe cleaner (various colours)
White glue
Scissors
Bowl
Q-tips
Use the scissors to cut a third off the top of each paper plate (instead of cutting the plate in half, cut it a little bigger on one side than the other). Discard the smaller portions. Poke holes along the outside perimeters of the plates. Cut multiple red hearts (or other colour) out of the construction paper.
Allow the kids to try winding the pipe cleaner through the holes of the paper plates. You may have to really help with this part as the objective is to stitch the two plates together with the cut portions at the top, being the opening of the purse. You will also use pipe cleaner to make the purse strap that the child can use to carry it around. Grizzly Bear was superior at manipulating his pipe cleaner. All three of the others gave it a valiant effort before manipulating me into doing it!
Put a dollop of glue into a small bowl and give a Q-tip to each of the kids partaking in the craft. Show them how to apply the glue to the red hearts using the Q-tip. Again, this is huge for fine motor skills while reducing the resulting mess from using the glue bottle. And no little bear arguments!
Allow them to decorate and wear their purses/man-bags around the house in a beary cute fashion show! This craft was a hit with all of the munchkins, even if a few pink hearts made it on to the blue-hearted man-bags! This was hugely popular with Sun Bear though, as she is only a few months into walking so a shoulder bag toy was a hit!
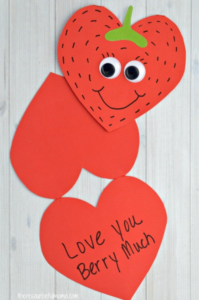
Photo courtesy of The Resourceful Mama.
Preschoolers
All of the kids partook in these punny card crafts too, although my four year old Grizzly Bear got the most enjoyment out of them by far!
We made two types of punny cards for his friends and relatives and they both landed Grizzly Bear in fits of giggles. He would march all over and chatter to anyone who would listen to him make the jokes over and over. It was too cute watching him get the joke behind it and genuinely laugh each time!
Here’s what you’ll need for punny card number one:
Red construction paper
Green construction paper
A black marker
Scissors
Bowl
Glue
Q-tips
First, fold the red paper in half along the long edge. This will allow you to make four cards. To make one card, cut large hearts out of the folded paper (when you cut the heart shape, you will get two hearts as you are cutting two pieces together). Be careful not to cut the hearts apart (you need to leave two sections at the top of the heart together so that the card opens like a card). Cut a small green ‘T’ shape out of the green paper.
Let your child make little black dots on the card’s face and use the glue and Q-tips (dollop of glue in a small bowl and apply with the Q-tip) to apply the green stem. When finished, the card should resemble a strawberry.
Inside the card, write the words “I Love You Berry Much.”
If your child is on the verge of kindergarten, or has a knack for using a pencil, help them to write the words. I have started teaching Grizzly Bear how to spell by writing words out in dots for him to trace over them. He then connects the dots to spell the words. He is getting quite good at all of his letters and has even starting stringing them together to read.
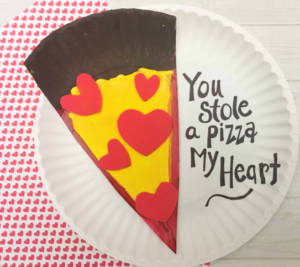
Photo courtesy of Surviving a Teacher’s Salary
Here’s what you’ll need for punny card number two:
Yellow construction paper
Orange or brown construction paper
Red construction paper (or other)
A black marker
Scissors
Bowl
Glue
Q-tips
This one pun lasted days and I bet it will give your child a laugh, especially if they like pizza.
First, fold the yellow paper in half along the short edge. This will allow you to make eight cards. Cut out isosceles triangles (to make pizza shaped cards). When you cut the triangle shape, you will get two triangles as you are cutting two pieces together. Be careful not to cut the triangles apart (you need to leave the top section of the triangle together so that the card opens like a card). Cut rectangular or trapezoid shaped ‘pizza crusts’ out of the orange or brown construction paper. Try to eyeball them to be the same shape as the crust side of the ‘pizza.’ Cut small hearts out of the red paper (or other colour) to be used as ‘pepperoni.’
Let your child use the glue and Q-tips (dollop of glue in a small bowl and apply with the Q-tip) to apply the ‘pepperoni’ hearts. The boys in my group seemed to prefer green ‘pepperoni,’ which I found a little disconcerting.
Inside the card, write the words “Here’s a Pizza My Heart.”
Again, if your child is curious when it comes to the written language, help him or her write the words. You can write words out in dots for him or her to trace over. He or she can then connect the dots to spell the words – Remarkable!
The Big Day
I really hope these ideas give you and your family some fun this Valentine’s Day! They have certainly kept me busy (well, busier!) and we’ve loved every minute of it! They’ve also helped all of the kids in my care build some pretty neat skills. Please feel free to give any one of them a try and let me know how it goes!
Have a sweet Valentine’s!
