Magic Tricks for Kids

Blog 83 - Photo

With all that is going on outside the home these days, my family has been cooped up for a while. We’ve done a few fun family indoor activities to keep things interesting and my son, Grizzly Bear, wanted to share one with you! Magic tricks!

Grizzly Bear has always loved magic. The first time we saw the movie Onward, he ran outside to grab a stick, called it a splinter, and asked me to say the magic words to turn it into a wizards staff. It was a heartbreaking moment to see his little chest fall with disappointment when nothing happened. So, since then, he occasionally comes up with his own magic tricks and puts on a show for us. This week, I had a chance to help him out. I looked up a few tricks for tots and we did the show together! These are the fun magic tricks we learned and they are easy for kids to do!

The Disappearing Penny
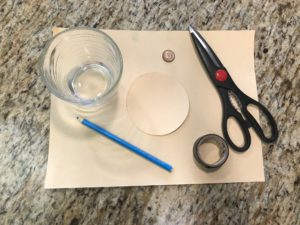
This one got me good, and got my husband too! It’s very easy for kids to do and even my three year old Polar Bear tricked his Dad. An old penny is made to disappear under a magic cup then reappear at will! My husband’s voice got all pitchy, his eyes widened, and he demanded Polar Bear show him the trick. Curious? Here’s how to do it.

The Materials:

  1. Two pieces of construction paper, the same colour
  2. A glass
  3. A pencil
  4. Scissors
  5. Tape
  6. A penny

The Prep:

Turn the cup upside down and use it to draw a circle on one piece of construction paper. Cut the circle out and tape it to the opening of the cup.

The Trick:

On the second piece of construction paper, put the penny on one side and the cup on the other. Show your audience the penny as it disappears under the cup you slowly slide over top of it. Then make the penny reappear again. Magic!

The Magic Scarf
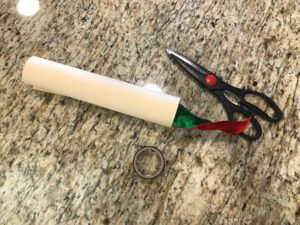
This one is cute and easy too! Grizzly Bear uses a paper telescope to show the audience nothing is there but paper, then he makes a scarf (we used Christmas ribbon) to appear out of thin air! Want to know the secret?

The Materials:

  1. A piece of construction paper
  2. Tape
  3. Scarf or ribbon

The Prep:

Roll the paper into a cylinder making it very tight on one side and leaving a gap on the other side. Stuff the scarf or ribbon into the gap.

The Trick:

Show the audience the telescope by looking through it at them. They can see there’s nothing inside. Then pull out the scarf or ribbon from the other side. Tah-dah!

The Vanishing Crayons
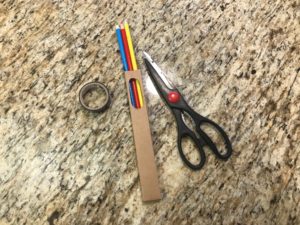
This one takes some nimble fingers but Grizzly Bear got it after a few tries. Crayons are shown in their box to the audience, then the box is flipped and the crayons vanish! It was very cute to watch him confuse his brother. Polar Bear had the most adorable look on his face trying to figure it out!

The Materials:

  1. A small box of crayons (four pack)
  2. A knife
  3. Scissors
  4. Tape

The Prep:

Cut a square hole in the crayon box to show the audience the crayons inside. This step isn’t required if your box already has a hole. Use the knife to cut the crayons in half and tape the top halves together so it still looks like a normal box of crayons to the audience but the bottom half of the box is empty.

The Trick:

When showing the crayons to the audience, apply pressure to the crayons in the box so the audience can see them through the hole. Then flip the box, toot some magic mumbo-jumbo, and poof! The crayons vanish!

My Shy Friend
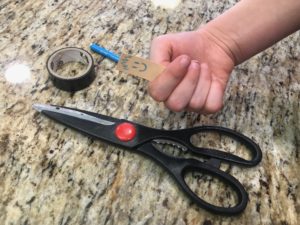
This one was by far my Grizzly Bear’s favourite magic trick! He loved his new friend and couldn’t stop giggling when he disappeared. After the show was over, he even followed my husband around while he did the dishes, showing him the little paper friend he had one second, and the next was gone! Need to know how?

The Material:

  1. Paper
  2. A crayon
  3. Scissors
  4. Tape

The Prep:

Cut a small piece of paper out, the width of your child’s finger and as long as a toothpick. Colour on a little smiley face on one side. Tape the bottom side to your child’s thumbnail.

The Trick:

As your child makes a fist with their hand, with the thumb on the inside of the fist, the friend is smiling at the audience. When the child’s hand opens, the friend disappears! He was inspirational, and my son even made it sound like the friend was shy. Adorable!

The Magic is in You!

I really hope you and your little one get a chance to try some of these out! Even in the familiarity of my own living room, I felt like I was laughing with a crowd in a big circus tent! But don’t forget, the magic is in you! Even though my children were the stars of our little magic show, I couldn’t help but feel the audience (me and my husband) were the magic in their eyes. When your child “gets up on stage,” be sure to give them your attention, be inspired by their talents, be amazed at their tricks, and laugh with them. Magic isn’t magic if there’s no one to share it with!

Fall Crafts and Décor Ideas

Ever peruse the magazines in the grocery store lineup before checking out? This time of year, I can’t help but look at all the fancy covers of living rooms decorated in bright reds, smashing oranges, and vibrant yellows – they all look so warm and cozy! Some years when I’m in a creative mood, I strive to make my home look as inviting as those. And this year, I’ve come up with a few ideas to help!

Four of these décor ideas are crafts for kids and parents to make together and one is for parents to make and kids to artistically display! Let’s dive right in!

Image sourced from Worth Writing For

Handprint Tree

Nothing quite says fall like a colourful tree. As a kid, I remember making this craft in school and bringing it home to my parents. I loved this craft so much, I even somewhat incorporated it into my wedding (I had a large painted canvas of a tree which people left fingerprints on as my guest book). Now I’m back with my kids making this craft – full circle!

This craft is ideal for the younger children just learning their way around glue, like ages 1 to 2 years. Keep a close eye on tots so things don’t end up in their mouths!

What you need:

  1. Construction paper
  2. Red, orange, and yellow leaves, tissue paper, or paint
  3. Glue or tiny fingers
  4. A brown marker

On a piece of construction paper coloured as per your child’s choosing, colour a brown tree trunk with the marker. If you’re not the artistic type, using your hand and forearm (or your child’s hand and forearm) can really help and give it a more personal touch. The forearm can be the trunk of the tree and the fingers can be the branches.

Use glue to add real leaves collected from outside (more environmentally friendly and a chance for adventure and education). If unavailable, you can also use coloured tissue paper or painted fingerprints! This craft is terrific for teaching your child about the environment and seasons (to be ahead of the game for preschool), and promotes fine motor skills! Also, throughout the crafting process, your child will also develop communication skills, social skills, and develop a healthy sense of self-esteem. Woohoo!

To add to your home décor, I find the best priced photo frames can be purchased at Canadian Tire! Who would have thought! I received ten different shaped ones for ten dollars in a multipack. The only downside is that they don’t always carry them so I have to keep checking whenever I’m in. The pro to framing your child’s artwork though is that you’ll have them forever and they make terrific and cost effective décor.

Image source from The Resourceful Mama

Sunflower Plates

Crave a beautiful bouquet of flowers on your table? Already have one but feel like it’s missing something? Add a paper plate sunflower!

This craft a great for busy hands just figuring out children’s sized scissors, like 2 to 3 years old! It also entices them to eat a healthy snack!

What you need:

  1. A paper plate
  2. A popsicle stick
  3. Paper
  4. Yellow and green paint
  5. Glue
  6. Sunflower seeds (in the shell)

Try this out for your vase! You will inspire fine motor skills, communication skills, social skills, and creativity!

Help your child paint the paper plate yellow and the other paper and popsicle stick green (or brown). Let them dry. Help your child cut out small triangles from the paper plate and a leaf or two from the green paper. All sunflowers look different so try not to micro-manage your child but let them experiments on their own. That being said, you know your child’s comfort level and skills better than anyone else – follow your instincts! Lastly, glue a handful of sunflower seeds to the sunflower’s face and the popsicle stick (stem) and leaf to the back. Voila!

To spruce up your kitchen, dining table, or even bathroom, put your flower(s) in a vase. I even sprayed mine with a bit of perfume to take that additional fun step! Afterwards, I was reminded (by the tots) to give them some shelled sunflower seeds as promised.

Image sourced from Home You

Leafy Mason Jars

This very nifty and pretty craft makes a glamorous kind of décor. It’s very pleasing to the eye and all over the fall theme we’re trying to create!

It’s easy but a little messy too, so I recommend for 3 to 4 year olds.

What you need:

  1. A mason jar
  2. Mod podge glue and brush
  3. Leaves

Gather some leaves from your local park and bring them home. Try to pick vibrant, dry leaves but ones that will hold up to a little handling (won’t crumble in your hands). It’s also best to do this sticky project outside if possible and wear old clothing if your child is a little new to glue. Gently brush some mod podge glue onto one side of the mason jar (we used old pickle jars) then stick your leaves on the glue. Mod podge over the leaves once they are on. Do the other side but try to hold the jar by the bottom or top to avoid getting sticky.

This project is great for the tot that has a little patience and enjoys the great outdoors so much that he or she wishes to bring it inside! It develops fine motor skills, and, with any craft project completed as a family, encourages communication and social development too! It’s also environmentally friendly as it uses leaves and recycled items. Win-win!

To decorate your home, nothing could be better! Use the colourful mason jar as a candle holder! It brings beauty and warmth to all! Just be sure to keep candles up high and away from little hands. Also never leave unattended.

Image sourced from The Mad House

Pinecone Hedgehog

This craft is also on the eco-friendly side and terrific for child development! Plus, you’ll get your very own little friend for the table centerpiece!

This craft is ideal for slightly older kids with more patience and who are developing a sense of social responsibility, like 4 to 5 years. Keep a close eye on hot objects!

What you need:

  1. A large pinecone
  2. Brown felt or paper or Play-Doh
  3. Black paint and white glue or a black marker
  4. Googly eyes or a black marker
  5. Hot glue gun (if needed)

There are a lot of options to making your own hedgehog pal. I tried to list the materials for the ones I could think of but feel free to experiment!

We went with the felt and hot glue gun option as we already have the materials and I wanted it to last in my décor bin for years to come.

Find a nice, large pinecone outside (one per hedgehog). Bring it inside and give it a name (my tots chose ‘Prickly’ and ‘Baby’). Cut out some felt or paper faces and ears. You can also use brown Play-Doh and smoosh it into the pinecone on one side, making a little point for its nose. If using felt or paper, mix together equal parts black paint and white glue and make little dots on the face for eyes and a nose (likewise, you can also just draw on a face with a marker). Leave the faces to dry (even the Play-Doh face). Once dry, hot glue gun on the felt or paper face. If using Play-Doh, glue on some googly eyes. You can even cut out and add little feet or pipe-cleaner whiskers to your hedgehog friend.

Again, this craft promotes many developmental skills and coordination in children. It may also promote responsibility if your child choses to carry around and care for a delicate ‘animal’ all day afterwards (be ready with the glue to fix any accidental mishaps!).

For décor ideas, place ‘Prickly’ or ‘Baby’ in your table centrepiece! He will be sure to bring warmth and coziness to your dinner that evening!

Doily Confetti

Ready for the big kid craft? I have always considered myself a big kid when crafting! This one is sure to knock your socks off (or on depending on your skills)!

A few years ago, I started making these tiny, fingernail sized doilies to help decorate for my sister’s bridal shower. I didn’t realize how much I’d fall in love with them or how dedicated I was to making my own personal set. They turned out to be very easy to make so I started making them for my favourite seasons and holidays.

Remember, this is recommended for just big kids (parents). Your tots can help you artistically display them on your dining room table after they’re complete!

What you need:

  1. A very thin crochet hook (B/1-2.25mm is what I use)
  2. Red, brown, orange, and yellow strand floss

This is a very inexpensive craft that looks so cute on any surface! It’s not for the faint hearted though! Watch the video I got started on here. This taught me how to make a slipknot, how to chain, and how to make both single and double crochets.

First make a slipknot, then chain two. Then make eight to ten (depending on the size of your hook) single crochets into the first chain made. You can either stop here and finish off as shown in the video, or, to make a wide variety of doilies, continue with a second round of single crochets, multiple single crochets within each, or double crochets. I chose to try a variety to see which worked best with the strand floss and my crochet hook. I found that one strand floss made 8 to 12 doilies (and strand flosses are $0.79 at Michaels Arts and Crafts Store so this was indeed a very cheap project. I can do this while cozying up on the couch with my munchkins and when all is complete, we can lay them out on our decorated table together with our pinecones and sunflowers!

The End

I really hope you and your kids enjoy these crafty ideas! It really helps bring fall alive and enjoy the last of the sunshine this year! If you have more ideas you’d like to share, please reach out! All the best and happy crafting!

Growing an Herb Garden

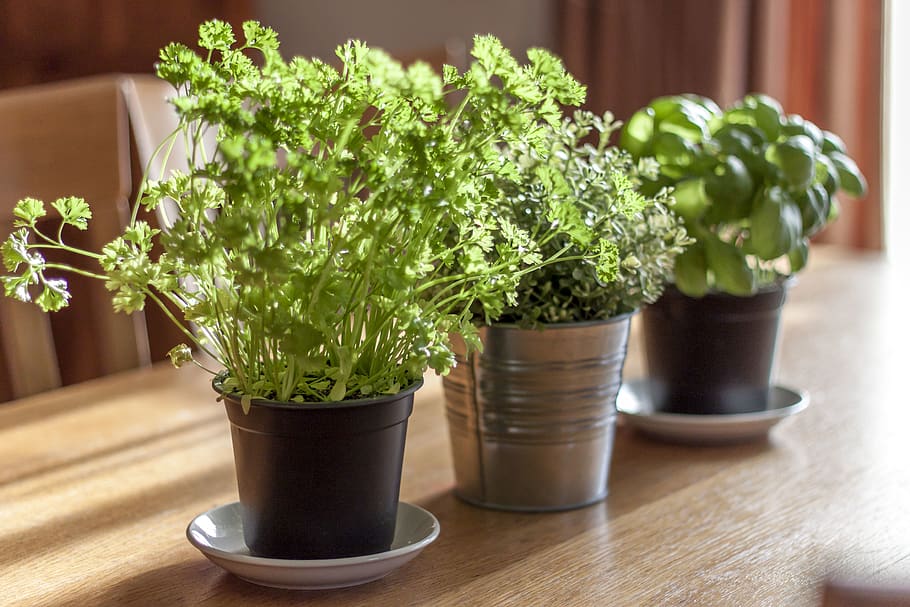
Growing an indoor or outdoor herb garden can be just as useful as it is fun! My boys and I have been working on a few projects since the beginning of 2020 and growing a successful little herb garden has been one of them. Of course it always helps if you have or know of someone with a green thumb. For me, that’s my sister! She taught me a lot of valuable insights when it came to taming chives, splitting parsley pods, and fluffing up basil bushes. If it wasn’t for her, my indoor creations would have been a flop. So now that I’ve mastered a few of these tricks, I’m going to share them with my KARA family! But first, let’s check out the benefits!

Herbaceous Benefits

Herbs have a wide variety of health benefits, including fighting infections (basil), reducing nasal congestion from allergies (rosemary), and relieving nausea and IBS symptoms (peppermint). They are also known to keep teeth healthy and freshen breath! Check out more benefits here.

Michigan State University also advocates that gardening has plenty of developmental benefits for children! Zipping around the lawn with tools and bags of seeds provides practice for gross motor skills. Pinching little seeds and grasping hand tools help develop fine motor skills. Playing with water and soil helps provide children with sensory play. Children are also able to develop reading skills when looking at garden tags, math skills when counting seeds, and a love of nature through nutritional education. And let’s not forget all the fresh air and exercise that are good for every family member! Check it out here.

Green Goodness

So now that we are familiar with the goodness of these greens, let’s start making our own from scratch!

What we need is:

  1. A medium to large pot with holes in the base
  2. Gardening soil (or a glass jar for sprouts)
  3. Seeds of desired herbs

Seeds that we planted included basil, garlic greens, sunflower greens, alfalfa sprouts, and a very cool little plant called burgundy oxalis. We also inherited a pot of chives that we have been mothering diligently.

I chose these plants because they are very easy to grow and work for a variety of dishes. I did try my hand at favourites like cilantro and parsley but found these extraordinarily temperamental. The cilantro came up all spindly and the parsley didn’t even germinate. Oh well – I’ll just have to keep practicing!

So let’s get down to the whys and hows of the plants that were successful! Oxalis burgundy shamrock grows wild in Alberta. Purple basil – nutmeg and basil. Lemon basil. Garlic greens! Alfalfa sprouts 5 days. Sunflower greens. Pea sprout 3 inches

Chives

Chives are the only plant I haven’t kept in my kitchen herbarium. That’s because they do so well outdoors! Chives are a perennial plant (they come back year after year) and can easily be grown indoors and out. Be careful with them though because their beautiful flowers spread seeds like crazy as they try to invade and take over your entire garden. Very edible and delicious, they are an onion that can be used in any pasta dish and can even be enjoyed raw from the garden.

I was lucky to inherit my already well established chives from a friend who planted them in their own large pot. This prevents them from getting out hand. However, as I understand it, chives are best planted and grown in cooler seasons like spring. In early May, my outdoor chives are already starting to bloom! They also prefer sunny spots and to be planted in well-draining, well-composted soil. Ensure that they are planted in the ground or a pot with holes in the base to prevent drowning. Sow seeds 2 inches apart and no more than ¼ inch deep (quite shallow with a sprinkling of soil on top). Harvesting them actually produces more chives if done properly as you can take one third of them by thinning them every couple of weeks. Just pick one stock for every three and you will always have happy chives!

Basil

Basil thrives in a sunny window in well-drained soil. It is super sensitive to cool weather so it sits in my south facing window right next to my kitchen sink. I find some herbs smell even when not cooking and basil is certainly one of them! Its powerful aroma is very pleasant though and really makes doing dishes more delightful.

Sowing seeds is very easy but must be done 10 to 12 inches apart. I only planted one as space was a commodity in my little herbarium, but that didn’t stop the basil from becoming one of the main attractions! It grew into a little tufty plant and if I kept taking leaves from the top, the basil got bushier and bushier on the bottom! Another super cool thing about basil is that you can take a cutting and germinate a new plant! Select a 4 inch section of basil that has not yet flowered and place it in water. Roots should form within a week and you can gift it to a close friend or make a second thriving plant. Totally awesome!

Another note – if you decide to plant purple basil instead of the regular kind, it tastes like nutmeg!

Garlic and Sunflower Greens

This was one plant that resulted from trial and error. My husband decided to grow his own garlic from a clove bought from the store. He brought home some garlic, ate almost all of it, but saved the last clove and buried it in a corner of the herbarium. Within a couple of days it had sprouted into what looked like a green onion stalk, and it didn’t stop there… My husband and I even started measuring its growth day by day, it was growing that fast! We placed a few bets too to see when it would outshine my other plants.  I called my sister to see what her thoughts were. She said that although it would never produce new cloves, the garlic green that was growing, at a surprisingly fast rate, was deliciously edible and very much worth the short amount of time it took to grow. We would chop off the green top little by little to munch on as a snack – absolutely scrumptious!

We later found out we can also do this with sunflower seeds (not roasted ones) harvested from our sunflowers. They make nice little greens that taste great in a salad!

Alphalpha Sprouts

These quick to germinate little sprouts are very easy to grow – and you don’t even need dirt! Just a glass jar and paper towel will work! Place about 2 tablespoons of alfalfa seeds in a glass jar and let them soak in 1½ cups of water overnight (6+ hours). Drain them through the paper towel (or cheese cloth or dish cloth). Put them back in the jar and add ½ cup of fresh water. Swill them around to wash them and drain again. Then leave the jar on its side with paper towel over the opening to allow them to spread out and the moisture to be partially trapped. Repeat the rinsing and draining process every morning and evening for 4 days, always leaving the jar on its side. The sprouts will be roughly 3 to 4 cm in length with green tips when ready to eat. You can then put them in a sealed container in the fried until needed. I also noticed that they lasted longer when wrapped in paper towel then in a baggie. Add to sandwiches and salads for a delectable treat!

Burgundy Oxalis

By far the coolest thing I’ve ever grown, this bushy plant grows easily and tastes exactly like a crisp green apple! For someone who is allergic to apples, this was a very welcome treat. Also known as purple shamrock, this plant is a type of clover. And with that said, it does contain a small amount of acid which can be toxic in high doses. Used in many foods found in the supermarket, the US National Institute of Health notes that it is safe for people who eat a variety of foods.

This plant tends to prefer shade but I’ve left two in my indoor herbarium facing a south facing window and they seem to love it! Both plants have grown into bushy clusters that overtake a few others. If planted in the garden, beware as it likes to get out of control.

Plant burgundy oxalis in well-drained soils and keep it well watered. Plant it in a shadier spot. If you want to keep it growing big but control it from spreading, pluck the little yellow flowers before they bloom. All the leaves, stems and flowers are edible on this plant – but refrain from eating too much!

Our Blossoming Best

So, there you have it. With minimal supplies, you can easily start your own growing adventure. While we’ve discussed several plants, there really are endless possibilities. I recommend that you plant what you most often use in your own cooking. This can be heavily influenced by your favourite cuisines, so if you love Italian food, perhaps basil and thyme might be good choices. If you enjoy Mexican, perhaps cilantro and oregano. Just remember that it’s always nice to try new things! I hope this has been helpful and has inspired you to start down the incredibly rewarding path of beginning your own small garden!

Valentine’s Day Crafts

Valentine’s Day is such a cute holiday to celebrate with little ones! Kids can exchange cards, parents can gift chocolates, and even the littlest ones can get dressed up in heart-shaped attire. It’s an adorable time for everyone!

This Valentine’s Day (and the 14 days leading up to it), I’ll be babysitting my niece and nephew. I really do have my hands full with four kids under five in the house but I thought it would be beneficial for everyone to let the magic of crafts entertain them! That’s why I’ve decided to post a little something on lovey-dovey crafts that will excite and inspire the munchkins! I’ve found a little something for everyone to partake in too – as I have a one year old Sun Bear, a two year old Polar Bear, a three year old Panda Bear, and a four year old Grizzly Bear. If you’re feeling as adventurous as me this week, give it a glittery whirl too!

Photo courtesy of Easy Peasy and Fun.


Infants

Even little babies can benefit from arts and crafts time. The bright colours, messy feel of paint, and fun interactions with parents can boost developmental skills – plus the resulting craft is a wonderful keepsake! Bonus, this craft works well for all ages but it is one of the few that is possible to do with infants.

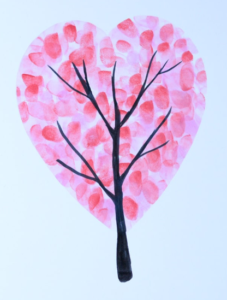
This Valentine’s craft idea is a super cute, heart-shaped tree! Here is what you will need:

One sheet of white paper

Washable ink pads or finger paint (varying colours)

One black marker

Start by drawing a tree trunk on the white paper with the black marker. Then you can use your child’s feet, hands, or fingerprints to outline a heart at the top of the tree where the leaves would be. If you use your child’s fingerprints, it honestly looks the best as it resembles leaves but your child may not be old enough to retain his or her attention for long enough to do this. If your child is quite young, I recommend using his or her feet and angle the footprints so they resemble a heart. It takes just seconds but it’s a fun one for you and an interesting activity for them!

This craft worked best on my three year old Panda Bear. It was captivating enough for him, as opposed to Grizzly Bear who found it boring, but it also held his attention, which was not the case for the younger two.

Photo courtesy of Events to Celebrate.


Toddlers

Toddlers, along with most age groups, love two things – messy art and art that doubles as accessories. So I helped the kids make springy heart crowns and fashionable purses. Both Sun Bear and Polar Bear loved these crafts!

Here’s what you’ll need for the crowns:

White and red paper (thick construction paper works best)

Pipe cleaner (various colours)

White glue

Scissors

Bowl

Q-tips

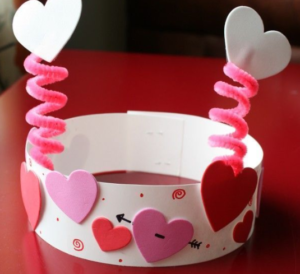
Use the scissors to cut long strips out of the white paper. You’ll need two strips to glue together, end to end, to make a crown-shaped hat for your child. It’s best to measure the paper against your child’s head before gluing. Cut out little hearts from the red paper.

Now put a dollop of glue into a small bowl. Give a Q-tip to each of the kids partaking in the craft and show them how to apply the glue to the red hearts using the Q-tip. This increases fine motor skills while also reducing the resulting mess from using the glue bottle. Bonus, it also prevents kids from fighting over the glue bottle. Panda bear was best at this stage too. He didn’t load on the glue like Grizzly Bear and he was by far cleaner than the others!

When the crowns are decorated, poke holes in the white paper to insert the pipe cleaners. Twist the pipe cleaners around themselves to keep them pointing upwards. You can then use your finger to twist the remaining pipe cleaner portions to give them bounce. Poke holes through a few hearts to add them to the pipe cleaners to give the crown extra flare. Allow the kids to show off their creations to each other! Polar Bear wore his crown for a full day, often wearing his and others’ whenever possible!

Photo courtesy of The Resourceful Mama.


Here’s what you’ll need for the purses:

Two paper plates per purse

Red construction paper (or other colour)

Pipe cleaner (various colours)

White glue

Scissors

Bowl

Q-tips

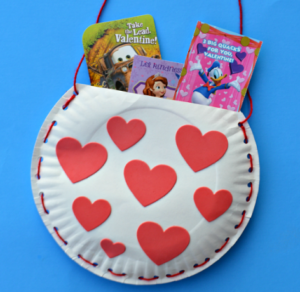
Use the scissors to cut a third off the top of each paper plate (instead of cutting the plate in half, cut it a little bigger on one side than the other). Discard the smaller portions. Poke holes along the outside perimeters of the plates. Cut multiple red hearts (or other colour) out of the construction paper.

Allow the kids to try winding the pipe cleaner through the holes of the paper plates. You may have to really help with this part as the objective is to stitch the two plates together with the cut portions at the top, being the opening of the purse. You will also use pipe cleaner to make the purse strap that the child can use to carry it around. Grizzly Bear was superior at manipulating his pipe cleaner. All three of the others gave it a valiant effort before manipulating me into doing it!

Put a dollop of glue into a small bowl and give a Q-tip to each of the kids partaking in the craft. Show them how to apply the glue to the red hearts using the Q-tip. Again, this is huge for fine motor skills while reducing the resulting mess from using the glue bottle. And no little bear arguments!

Allow them to decorate and wear their purses/man-bags around the house in a beary cute fashion show! This craft was a hit with all of the munchkins, even if a few pink hearts made it on to the blue-hearted man-bags! This was hugely popular with Sun Bear though, as she is only a few months into walking so a shoulder bag toy was a hit!

Photo courtesy of The Resourceful Mama.


Preschoolers

All of the kids partook in these punny card crafts too, although my four year old Grizzly Bear got the most enjoyment out of them by far!

We made two types of punny cards for his friends and relatives and they both landed Grizzly Bear in fits of giggles. He would march all over and chatter to anyone who would listen to him make the jokes over and over. It was too cute watching him get the joke behind it and genuinely laugh each time!

Here’s what you’ll need for punny card number one:

Red construction paper

Green construction paper

A black marker

Scissors

Bowl

Glue

Q-tips

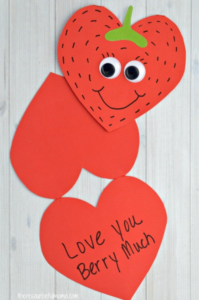
First, fold the red paper in half along the long edge. This will allow you to make four cards. To make one card, cut large hearts out of the folded paper (when you cut the heart shape, you will get two hearts as you are cutting two pieces together). Be careful not to cut the hearts apart (you need to leave two sections at the top of the heart together so that the card opens like a card). Cut a small green ‘T’ shape out of the green paper.

Let your child make little black dots on the card’s face and use the glue and Q-tips (dollop of glue in a small bowl and apply with the Q-tip) to apply the green stem. When finished, the card should resemble a strawberry.

Inside the card, write the words “I Love You Berry Much.”

If your child is on the verge of kindergarten, or has a knack for using a pencil, help them to write the words. I have started teaching Grizzly Bear how to spell by writing words out in dots for him to trace over them. He then connects the dots to spell the words. He is getting quite good at all of his letters and has even starting stringing them together to read.

Photo courtesy of Surviving a Teacher’s Salary


Here’s what you’ll need for punny card number two:

Yellow construction paper

Orange or brown construction paper

Red construction paper (or other)

A black marker

Scissors

Bowl

Glue

Q-tips

This one pun lasted days and I bet it will give your child a laugh, especially if they like pizza.

First, fold the yellow paper in half along the short edge. This will allow you to make eight cards. Cut out isosceles triangles (to make pizza shaped cards). When you cut the triangle shape, you will get two triangles as you are cutting two pieces together. Be careful not to cut the triangles apart (you need to leave the top section of the triangle together so that the card opens like a card). Cut rectangular or trapezoid shaped ‘pizza crusts’ out of the orange or brown construction paper. Try to eyeball them to be the same shape as the crust side of the ‘pizza.’ Cut small hearts out of the red paper (or other colour) to be used as ‘pepperoni.’

Let your child use the glue and Q-tips (dollop of glue in a small bowl and apply with the Q-tip) to apply the ‘pepperoni’ hearts. The boys in my group seemed to prefer green ‘pepperoni,’ which I found a little disconcerting.

Inside the card, write the words “Here’s a Pizza My Heart.”

Again, if your child is curious when it comes to the written language, help him or her write the words. You can write words out in dots for him or her to trace over. He or she can then connect the dots to spell the words – Remarkable!

The Big Day

I really hope these ideas give you and your family some fun this Valentine’s Day! They have certainly kept me busy (well, busier!) and we’ve loved every minute of it! They’ve also helped all of the kids in my care build some pretty neat skills. Please feel free to give any one of them a try and let me know how it goes!

Have a sweet Valentine’s!

Spooky Halloween Crafts

How to have a great All Hallows’ Eve on a budget! This year, I’ve learned my two boys are starting to really get into the spirits’ spirit and asking for ever more creepy decorations around the house! I’ve done the usual paper plate and cotton ball decorations but want to really up my game on decorating the front porch. How can this be done on a budget? And with little time (as I seem to lack this too)!

Those inflatable creatures and light shows on my neighbours’ lawns are simply amazing! But, if I want to afford Christmas this year, I had to get creative with help from my family! And I’d love to share my spooky trash upcycling secrets with you!

The Halloween Pom-poms

This one was a craft I stumbled upon many months ago when I was prepping for my sister’s wedding. In order to decorate my house to be fit for a bride, I found white tissue paper pom-poms made my house look elegant and striking. For Halloween, I made the same pom-poms but using black and orange tissue paper – and it looked ghastly!

Here’s how:

  • Take five pieces of tissue paper, stacked one on top of the other, and fold them over like a fan or accordion.
  • Wrap wire around the centre of the fan, tying it tight (I used floral wire because of the abundance I currently find around the house now but you can also use pipe cleaner).
  • Gently pull the tissue away from the tips and into the centre, in all directions, until it looks like a large tissue ball.
  • Hang it from the trees outside – this is a great part to do with your kids!

The Ghastly Ghosts

As I stopped at the store last weekend, I was shocked that there were no pumpkins left to be carved! The shortage wasn’t going to slow me down though, I thought, so I grabbed a couple of 4 litre jugs of milk instead.

Why? To make a few ghoulie ghosts for my own front steps. Here’s how:

  • Empty the jugs into another refrigerable container and store for breakfast cereal.
  • Wash out the containers and cut a small hole in the bottom of each.
  • Let your kids draw some spooky or silly faces on the milk jugs with black sharpies – don’t forget to colour them in!
  • Plug in a strand of Christmas lights, preferably white, and creep them down your front steps, bunching them up in the spots the ghosts will sit.
  • Put the ghosts on top of the bunched up lights, ensuring the lights are within the holes cut in the bottom.
  • Alternatively, if you’ve got a good ladder and kids that listen remarkably well, you can also hang the lights and use tape to keep the lights within the ghosts so that they are actually flying.

The Sinister Spider

This one might give grandma palpitations – it’s not for the faint hearted – but my kids loved it!

For my sister’s wedding, I strung up a ton of wedding bells in the centre of my room (this was where the bridesmaids were doing hair and makeup morning of). Then I strung streamers from the centre of the ceiling to the walls. To all the ladies, it looked beautiful, but to my four-year old son, it “looks like a spider web.”

Which gave me an idea.

  • Fill one black garbage bag with leaves or anything else soft and filling. Tie it shut.
  • Tape or tie the garbage bag slightly off-centre so that there is a large section, which will be the abdomen, and a small section, which is the head.
  • Take a second black garbage bag and cut it lengthwise into eight pieces so that you have eight long legs.
  • Tape or tie the spider together and then to the front porch banisters or to a tree.
  • Use white streamers to make a web around the spider.
  • You can also add eyes using construction paper – my son found that red was the creepiest.

The Eerie Witch

This is a craft my parents have done a few times in their front yard. It helps if you have a creepy large cauldron full of candy. One year, my brother hid in the cauldron and jumped out when approached. He nearly froze his toes off so I don’t recommend that part.

But do try this eerie, faceless balloon witch! She’s (nearly) priceless! Here’s how:

  • Blow up a green balloon and tie it closed.
  • Get a black garbage bag and slit it on one side so you could wear it like a cape.
  • Put it over the balloon like a hood and tie or tape it to the tied part of the balloon. The green balloon should look like a face with a black hood and a black, flowy cloak.
  • Make a witch’s hat out of construction paper by making a cone out of black construction paper and stapling or taping it together. Take a second piece of black construction paper and cut out a large circle (don’t cut out the inside circle where a normal head would fit because our balloon witch can’t hold on to her hat if the wind picks up). Instead, just tape the cone to the centre of the circle, and the centre of the circle to the witch’s head.
  • Hang the witch up using fishing line or another type of string and tying her to an overhanging tree branch or soffit.
  • Watch her sway unnervingly in the breeze.

The Haunting Howls

Lastly, the most effective and least costly idea – sounds to accompany the sights.

I like to play fun Halloween songs in the house for the kids, namely The Monster Mash, The Purple People Eater, and I Put a Spell on You, among others. It gives the spirit of Halloween an extra kooky theme with dancing and sing-along fun! My siblings and I loved all of these songs growing up and now, so do my kids!

However, if you are looking to really spook some older kids or want an extra unearthly edge over your neighbours’ Halloween displays, nothing compares to werewolf sound effects! Just ensure your neighbours don’t mind the hair-raising vocalizations!

Happy Halloween!

As always, I hope you and your family have a safe and fun holiday! Don’t forget to dress everyone in extra winter gear to stay warm and wear reflective garments to be seen in the dark. If you need reminders or tips on how to stay safe, please check out last year’s Halloween blog here!

Have a FANGTASTIC Halloween!

Back to School for Tots!

It’s that time of year again – back to school! What an exciting time for those that are returning to school or for those who will be attending for their first time! But for those kids that are still preschool aged, not getting to hop on the yellow bus with their friends, this time of year can be a little disheartening. We experienced this in our household this year. Our two boys attend a dayhome that is full of school-aged children during the summer months. This week, when school was up-and-running again, and my boys were faced with saying goodbye to their new friends, we noticed their faces looked as gloomy as the rainy weather.

To help blow their troubles away, with the added perk of educating them in all-things-school, we sat down together to do some back-to-school crafts! This really helped brighten their moods and learn a thing or two about what their friends were up to while they’re away!

Tissue Box School Bus

Every morning, my kids and I arrive at the dayhome at the same time the older kids are leaving to catch the bus. Sometimes, we even see the bus coming to get them. Longingly, my boys, especially my older four year old, watches the bus and gets excited when it stops to pick up his friends. Last weekend, we decided to make his own school bus with a tissue box, paint, and a picture of him and his brother. Here’s how:

  1. Help your child paint a tissue box to look like a school bus using yellow, black, white, and red paint. The tissue box can be full or empty.
  2. Cut out square-shaped pictures of your child(ren) and yourself. Glue them into the windows of the school bus.
  3. Let your child(ren) play with the school bus and pretend to go to school!

Apple Stamps

Apple and paint crafts are a staple in all kindergarten classrooms; I even remember doing them when I was little! They are very easy to prep, do, and enjoy. My little ones had a blast! Here’s how:

  1. Get a couple of apples and cut them in half from the top to the bottom, allowing the classic heart‑shaped apple look to be your guide. If you are lucky enough to have crab apples growing in your backyard, these are perfectly sized for little hands.
  2. Use any kind of paper to be your canvas. Help your little ones paint the heart-shaped side of the apple and make apple prints on your paper! You can also jazz these up with sparkles or (what my boys preferred) using stamp pads to mix and match colours.

Popsicle Pencil Bookmark

Help your kids develop a love of reading big books with their very own bookmark! I explained to my kids that when I read big books, I use a bookmark to help me remember the last thing I read. This may inspire them to pick up big books and use their own special bookmark to keep their place! Here’s how:

  1. Cut a piece of cardboard as thick as three popsicle sticks wide (wider or thinner also works!), making sure to leave a triangular shape at the top for the top of the pencil.
  2. Help your little ones to glue the popsicle sticks into place on the cardboard and colour them yellow with a marker, pencil crayon, or paint. We also coloured them silver and pick at the bottom to make our pencil have an eraser.
  3. Help your little one colour the top of the pencil, the triangular shape, white and then black on the tip. You’re done!
  4. Help your little one mark his or her page in their book using their new bookmark!

Monster Pencil Cases

This final craft was one that really excited my children and also helped them develop superior fine-motor skills. It was so exciting because they got to use Mommy’s crochet yarn and boog googly eyes! They, with a little help, made their own pencil cases – in monster form! Here’s how:

  1. Using one full sized piece of craft foam paper, fold it 4 ½ inches up from the bottom. Then fold the remaining top down. When folded, the top of the paper should reach approximately halfway down, giving the monster a mouth. The monster should now have the appearance of an envelope.
  2. Mark out 15 dots along the edges of the envelope, not along the folded top, but along the folded bottom and back of the envelope. Do this to both edges.
  3. With a child-safe plastic yarn needle and contrasting coloured yarn, help your child pierce the craft foam on the dots, sewing the sides of the envelope together. This should close the envelope sides and provide a pencil case structure. Tie off the yarn on each side.
  4. Lastly, let your child draw teeth and put googly eyes on his or her monster pencil case! In our house, we even used sticky-backed Velcro to allow the pencil case to open and shut. It was a hit!

Summer is Over – But Back to School is Only Beginning!

Try out these school crafts with your little ones! Enjoy being the first to introduce them to bookmarks, pencil cases, apple art, and school buses! It won’t be long before they are bringing home school projects that they’ll be teaching you!

Indoor Crafts

Snowy Days and Indoor Crafts

As the weather turns, it’s difficult to keep our kids active and inspired. Rather than turning to the same old toys and television, I urge parents to try some indoor crafts! And, there’s no better time like the present because there’s another fun holiday around the corner, and terribly low temperatures leading up to it. Knowing this, my sons and I have been working extra hard on decorating our home with DIY Valentine’s Day crafts!

Craft Making – The Importance of it

Craft making is inspirational!  Not only does it help young ones develop fine-motor skills and give them that boost of self-esteem (sometimes I wonder if my kids really need it), it also helps promote innovation, creativity, problem-solving skills, and socializing! Recently, researches in this area have found a connection between the skills developed during arts and crafts time and success in later years of life. They concurred that toddlers and preschoolers develop what are called visual-processing skills when they create a crafty project. Visual-processing skills incorporate our ability to recognize patterns, find sequences in patterns, and identify spacial patterns. In simpler terms, if you have a blue triangle and you’re trying to fit it into a yellow, circular hole, you will be able to recognize that it doesn’t fit before even trying it. These same skills are what mathematics, geometry, and reading rely heavily on. Researchers also found that children who have regular arts and crafts time also have greater memory skills, muscle memory, and planned behavior. These skills are indicative of professional leadership skills (click here).

Woohoo! Now let’s bust out some romantic crafts! I’ve divvied up these crafty ideas based on age for ease of perusing.

Newborn to One Year Old

A Salty Keepsake

You can never have too many cutie-pie feet or handprint décor in your house, so try making this one with your squirmy baby (it’s easier to use and cleaner than paint!). You will need:

1 cup of salt

2 cups of flour

¾ cups of water

5 drops of red food colouring (more if you desire red rather than pink)

1 large mixing bowl

1 mixing spoon

1 rolling pin

1 well-rested baby

Stir the salt and flour together in the mixing bowl. Gradually mix in the water until you have a nice, doughy consistency. Knead in the red food colouring until you have the desired colour and then roll the dough as if you were about to cut it into cookies (but don’t because they won’t taste very good!).

Using your baby’s feet or hands, make a print in the dough. I liked making heart shapes with their feet and then cutting a heart shape around it. I also made a small hole at the top so that I could lace a string through to hang it up.

After your unique baby creations are created, place the salty memories in the oven at 180 °C for about 10 minutes (times vary depending on the size and thickness of creations).

Note: You can also paint and varnish your creations if you desire to make your own homemade toys!

One to Two Years Old

A Sticky Situation

If you’re like me and allow your children as much free rein as possible with arts and crafts (within reason), you’ll want to have a go at this one! What you’ll need:

1 piece of paper (I prefer cardstock as it will allow for a lot of glue without getting soggy)

1 bottle of glue or glue stick

Approximately 30 pieces of coloured paper, roughly 1 x 1 inches in size

1 black marker

1 adventurous toddler

I drew a large heart on a white piece of cardstock with a black marker, added a bunch of glue to the inside of the perimeter, and provided my son with little pieces of coloured paper so that he could decorate as he saw fit. It worked very well – the third time.

Haha! I mean to say he had fun each and every time he tried it but he mastered new skills along the way, making his third attempt worthy of carefully scraping it off the highchair to hang on the wall.

Two to Three Years Old

Fashionista in the Making

Kids at this age love to play dress-up, so why not fashion your own trinkets? If you can get your hands on these, or similar items, try making this DIY Valentine’s Day crown and necklace:

6 pieces of pipe cleaner, red or pink

1 piece of white cardstock (lengthy enough to fit the circumference of your child’s head)

20 to 30 foam or paper hearts

1 pair of children’s scissors (or a holepunch, if available)

1 pencil

Tape or stapler

1 apprentice jeweler

First, measure your child’s head using the cardstock paper. Mark it with a pencil (don’t cut it while it’s near your child for risk of injury or a nasty haircut). Cut and tape it. Let your child decorate it with the hearts and pipe cleaner.

I liked showing my son how to wrap pipe cleaner around his finger to give it a spirally appearance. We then put hearts on them and taped them to either side of the crown to appear as ears.

For the necklace, holepunch or cut holes in the centres of the remaining hearts and let your child poke the other pipe cleaner pieces through them. Twist the pipe cleaner ends together so that they will make a lovely, romantic necklace with heart shaped jewels!

Three to Four Years Old

A Basket of Roses

My son is obsessed with bringing me flowers ever since he was allowed to pick them in my Mom’s garden this summer (she told me he was more accomplished at demolishing her flowers than the neighbourhood rabbits). This year, we made some DIY roses in a freshly decorated Chinese noodle box. They smell excellent.

What you need:

1 Chinese noodle box (or tissue box cut in half width-wise)

18 to 20 coloured mini (or regular sized) cupcake liners

6 green pipe cleaners

1 small floracraft (or styrofoam)

2 sheets of red tissue paper

Tape

1 amateur florist

Help your child turn the cupcake liners inside out so that the coloured portion will end up being the inside of the roses. Stack three liners on top of one another and poke the pipe cleaner through the centre of the stack, so that it is just poking through, and twist slightly so that is remains in place. Do this for all six of the flowers.

For the basket, tape the tissue paper to the outside to give it a beautiful glow. Place the floracraft inside the box and cover with more tissue paper. Then poke your pipe cleaner flowers into the floracraft. Viola! A beautiful centerpiece your guests are sure to comment on!

Four to Five Years Old

A Watercolour World of Hearts

For the most hardened of young artists, there is black paint and watercolours. This project takes a little prep work from parents as it requires a day for the glue to dry before your young creator can get to work, but it’s well worth the wait! What you need:

1 piece of cardstock paper

1 bottle of white glue

1 tablespoon of black paint

1 tray of watercolours

1 glass of water

1 paintbrush

1 pair of child’s scissors

1 aspiring artist

Empty one half of the glue out of the bottle and add the black paint (the bottle should contain ½ white glue, ¼ black paint, and ¼ air), and mix well. Next, draw hearts onto the cardstock paper and let dry for one day. My son seemed to like when the hearts had many sections in them as it gave him more areas to paint with different colours.

After the black glue is dry, let your child watercolour away! The watercolour paint doesn’t take nearly as long to dry (about half an hour). After we cut ours out, we taped them to his bedroom window so that it had a stained glass effect!

Shopping List and Other Indoor Craft Ideas

I do hope you and your family have fun trying these artsy ideas! All of the materials were available at the dollar store, except for the floracraft, which was obtained from Michaels, and the Chinese noodle box, which was left over from lunch. They were all relatively well priced (even the lunch!) and many colour options were available.

If you’d like more DIY craft ideas, I strongly suggest attending KARA’s Creative Play & More program, which is a free, drop-in program. KARA staff will surely astound you with the many crafty ideas they possess. Please come join us for an artsy day this week!

Kids and Colours

A friend of mine recently had his first baby and, in his new excitement of being a father, he introduced me to a phenomenon between children and colours. Until now, I hadn’t heard of the different effects colours had on people and was intrigued when he told me that colours could affect children’s moods, even enough to make them go to sleep on time or eat their broccoli. The book he introduced me to is called Start Smart: Building Brain Power in the Early Years by Pam Schiller.

To sum up, Schiller describes how colours can enhance learning and influence mood; she gives her insight as to which colours can do what to children and how colours can be used in a classroom or at home to build brain power (not to mention help parents out too).

A chart from the book indicates the following colours can have these effects:

Red The colour red can create alertness and excitement. It usually encourages creativity and appetite. This colour can also be disturbing to anxious individuals.

Blue Blue can create a sense of well-being and lower a person’s temperature.

Sky blue is especially tranquilizing. Blue also has the effect of decreasing appetite.

Yellow This colour is the optimal colour for maintaining attention and encouraging creativity. It also creates a positive feeling.

Orange Orange can increase alertness.

Green Green creates a feeling of calmness.

Purple Purple also creates a feeling of calmness.

Brown The colour brown can increase the sense of security and relaxation. It also has the effect of reducing fatigue.

Off-white This colour can create positive feelings and help maintain attention.
Over the last couple of weeks, I decided to implement this new knowledge in the lives of my kids, but before busting out the paint to colour the walls of my boys’ room, I thought it would be best to perform some harmless experiments to see if Schiller’s findings applied to our lives as well.

Red – I started putting red napkins (in lieu of red placemats) under my children’s’ plates during meals. My kids did eat slightly more food without the continual prompting but my youngest son, Polar Bear, did proceed to tear the napkin into shreds and attempt to eat it. I also introduced a red ball into the playroom. Both children love this new ball and it’s the first one they go for when playing catch. It may be that it is the “new toy” and the other balls just don’t cut it anymore.

Blue – This experiment was exercised by taking my boys for walks outside. It is true that we take walks outdoors all the time but this time I monitored the children on clear, sky blue days. They did seem to be calmer during this activity. It could also have been the fresh air, but my children seemed to argue a lot less when they were outside, often sharing toys and throwing less tantrums.

Yellow and off-white – Schiller’s book portrays these colours as being the best for a school classroom as they have properties to increase and maintain attention. I used yellow during book time to help my children keep their little hands and bodies still while I read to them. I chose only books with yellow jackets which seemed to do the trick (although they may have just been used to the routine). I also broke out an off-white colouring book and provided only yellow crayons to my older son, Grizzly Bear. He did spend a little longer working on his colouring than normal which was a breakthrough since he doesn’t enjoy art and crafts that much.

Orange – Like red, this colour did bring a new level of alertness to my children’s lives when I brought home pumpkins this Halloween. They both became enthralled by the activity and had no issues zeroing in on the activity, diving into the fun and destroying the kitchen. Admittedly this could have something to do with children loving messy play, but it may have been the colour orange too.

Green and purple – Admittedly I did not use the colour purple for any experiments, but I did use green. I set up a green coloured canopy in their room and laid them under it for nap and bedtimes. They seemed to enjoy the canopy and stare at it. My Grizzly Bear continually asked what it was and why it was there, but he did fall asleep faster each night the week that it was up. I also put on nature documentaries for my children (this wasn’t an experiment, just something I do regularly). I did take note that my kids (and I) became calmer and happier when rainforests and oceans dominated the scenery.

Brown – I did not introduce this colour to my children as an experiment but I did take a look at my own life and the influence brown has on it. I noticed that many houses on my street are brown and wondered if the colour choice by the developer was intentional. I also noticed that my parents’ vehicle is brown, and I do feel quite safe when in it, although that may be because my Dad is often the driver.

These little activities and experiments were fun to complete and entertaining for my children. While I still don’t know if I’m a believer, I did notice a few times that colours really did have different effects on my children (although hunger and exhaustion did trump most effects). All in all, perhaps I will take the plunge to paint the walls green with a tranquilizing blue ceiling!